Command Line Tips
- To copy in PuTTY, select text by left clicking. Once you have the area selected, left click the selected text
- To paste in PuTTY, right click in the window
- When installing Plesk, you will need to type "n" and press enter to continue unless otherwise noted in this guide.
To get started with this guide, you will need an SSH client to connect to your VPS. We recommend that you download and install PuTTY. You can read more articles about PuTTY on our PuTTY Guide page. You will also need your SSH credentials from the control panel.
This article assumes that you are already familiar with how to log in to the customer control panel. If you do not know how to log in or have forgotten your password, please refer to this article first.
- On the control panel Home tab, click "More" under the Server Management section.
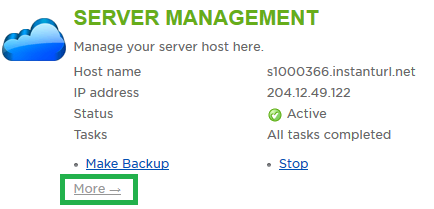
- At the top of the page you will find your server's default administrative login credentials, unless these have been changed since the server's provisioning.

- Open up PuTTY and type root@ipaddress. Click Open.
- Paste or type in the root password.
- Once at the command line, enter:
/usr/local/psa/bin/ipmanage --reread && wget http://autoinstall.plesk.com/plesk-installer && chmod +x plesk-installer && ./plesk-installer
- Press enter. This will download the install script. Set the permissions to executable, and run the installer.
- You will be prompted with a welcome message. Once you read the message, select Next page by pressing N.
- The next screen should be set to:
Current settings:
Install products from Parallels server
Install required system packages from Parallels server
Store downloaded files in: /root/parallels
- If it is not set to install from Parallels server, press S and then enter; otherwise go to step 10. Select Option 2, and continue to the next step.
- The next option should be set to Do not use proxy - press N to continue.
- One the next page, you will need to change the option to Parallels Plesk Panel (11.5.* or newest current version). Select option 2 by entering the number 2. You will see an asterisk next to Parallels Plesk Panel (11.5.*, or most recent version). Continue to the next step.
- You will get a question asking "Would you like to help Parallels make better products by sending information about installation, upgrade, and other problems? [Yes]" you may select the option based on your needs. Type either yes or no.
- If you get an error on the next prompt, it may be related to "Unable to find main IP" address in PSA database. You may skip this step if no errors appear. This should only occur if you have not done initial setup of Plesk, however, if it does, running the command below should fix it:
/usr/local/psa/bin/ipmanage --reread
- You will be asked about disk space. Assuming the required space is available, continue to the next step.
- If updates are available, press N and continue to the next step, the installer should now install the required packages.
- Once the installer has finished you may type the following command to update the operating system:
yum -y update && yum -y upgrade
If you have any further questions that were not answered in this article, please contact us.
| 